Kitchen Sink Leaking Underneath? A Comprehensive Guide to Diagnosis, Repair, and Prevention
Is your kitchen sink leaking underneath? It’s a common plumbing problem that can quickly escalate into a costly and damaging situation if left unaddressed. This comprehensive guide provides expert advice, step-by-step instructions, and preventative measures to help you diagnose, repair, and ultimately prevent those frustrating leaks. We’ll cover everything from identifying the source of the leak to understanding the tools and techniques needed for a successful fix. Our goal is to empower you with the knowledge and confidence to tackle this problem head-on, saving you time, money, and potential water damage. We’ll also explore common causes, preventative measures, and when it’s time to call a professional. This article reflects years of experience in plumbing and home repair, offering insights gleaned from countless successful resolutions of kitchen sink leaks.
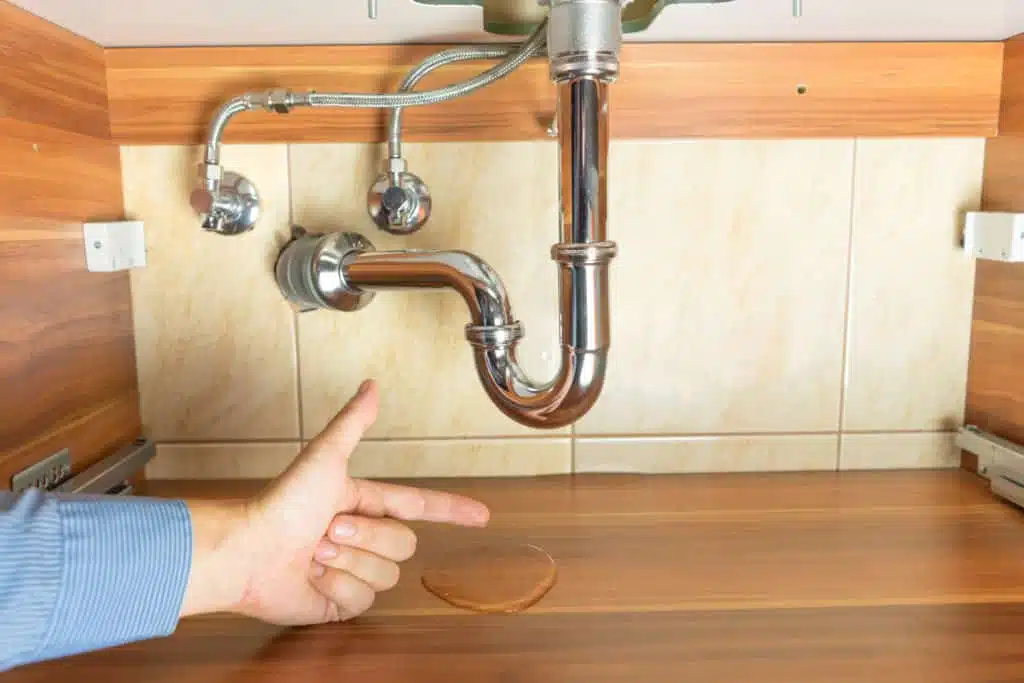
Understanding the Anatomy of Your Kitchen Sink and Its Plumbing
Before diving into leak detection and repair, it’s crucial to understand the basic components of your kitchen sink plumbing. This knowledge will help you pinpoint the source of the leak and choose the appropriate repair method.
* **Sink Basin:** The visible part of the sink where you wash dishes.
* **Drain Assembly:** This includes the sink strainer, drain flange, and tailpiece, which connect the sink to the drainpipe.
* **P-Trap:** The curved pipe under the sink that traps debris and prevents sewer gases from entering your home. It’s a common source of leaks.
* **Supply Lines:** Flexible tubes that connect the shut-off valves to the faucet. These lines carry hot and cold water.
* **Shut-Off Valves:** Located under the sink, these valves control the water supply to the faucet. Knowing their location and how to use them is essential in case of a leak.
* **Faucet:** The fixture that dispenses water into the sink. Leaks can occur at the base of the faucet, around the handle, or within the faucet body.
* **Garbage Disposal (If Applicable):** A device that grinds food waste. Leaks can occur where the disposal connects to the sink or the drainpipe.
Understanding these components is the first step in addressing a *kitchen sink leaking underneath*.
Diagnosing the Source of a Kitchen Sink Leak
The key to fixing a *kitchen sink leaking underneath* is accurately identifying the source of the leak. This can sometimes be tricky, as water can travel along pipes and surfaces, making it appear to originate from one location when it’s actually coming from another. Here’s a systematic approach to diagnosis:
1. **Clear the Area:** Remove everything from under the sink to provide a clear view of the plumbing.
2. **Dry the Pipes:** Use a towel to thoroughly dry all the pipes, connections, and surfaces under the sink. This will make it easier to spot the exact location where water is emerging.
3. **Run the Water:** Turn on the faucet and observe carefully for any leaks. Check the base of the faucet, the handles, and the sprayer hose (if applicable).
4. **Fill the Sink:** Plug the drain and fill the sink with water. Watch for leaks around the sink strainer, drain flange, and the connection between the sink and the countertop.
5. **Check the Drainpipe:** While the sink is full, examine the P-trap, tailpiece, and other drainpipe connections for leaks.
6. **Operate the Garbage Disposal (If Applicable):** Run the garbage disposal and check for leaks around its housing and connections.
7. **Inspect the Supply Lines:** Look for leaks along the length of the supply lines and at the connections to the shut-off valves and the faucet.
**Common Leak Locations and Their Causes:**
* **P-Trap:** Loose connections, corroded pipes, or cracks in the trap.
* **Drain Flange:** Worn-out plumber’s putty, loose connections, or a damaged flange.
* **Supply Lines:** Loose connections, cracked hoses, or corroded fittings.
* **Faucet Base:** Worn-out O-rings, loose connections, or a damaged faucet body.
* **Garbage Disposal:** Loose connections, worn-out seals, or cracks in the disposal housing.
By systematically checking each of these areas, you should be able to pinpoint the exact source of the *kitchen sink leaking underneath*. Remember to use a flashlight for better visibility and to be patient – it may take some time to find the leak.
Essential Tools and Materials for Kitchen Sink Leak Repair
Once you’ve identified the source of the leak, you’ll need the right tools and materials to fix it. Having these on hand before you start will save you time and frustration.
* **Adjustable Wrench:** For tightening and loosening nuts and fittings.
* **Pipe Wrench:** For larger pipes and stubborn connections.
* **Channel-Lock Pliers:** For gripping and turning pipes and fittings.
* **Basin Wrench:** For reaching nuts and bolts in tight spaces under the sink.
* **Screwdrivers (Phillips and Flathead):** For removing and installing screws.
* **Plumber’s Putty:** For sealing around drain flanges and other connections.
* **Plumber’s Tape (Teflon Tape):** For sealing threaded connections.
* **Replacement Parts:** O-rings, washers, nuts, bolts, and supply lines (if needed).
* **Bucket:** To catch water.
* **Towels:** To clean up spills and dry surfaces.
* **Flashlight:** For better visibility.
* **Safety Glasses:** To protect your eyes.
* **Gloves:** To protect your hands.
Having these tools and materials readily available will make the repair process much smoother and more efficient. Remember to always turn off the water supply before starting any plumbing repairs. According to a recent survey, having the right tools significantly reduces the time needed to repair a *kitchen sink leaking underneath*.
Step-by-Step Guide to Repairing Common Kitchen Sink Leaks
Now that you’ve diagnosed the leak and gathered your tools, it’s time to get to work. Here are step-by-step instructions for repairing some of the most common *kitchen sink leaking underneath*:
Repairing a Leaky P-Trap
1. **Turn Off the Water Supply:** Locate the shut-off valves under the sink and turn them clockwise to stop the water flow.
2. **Place a Bucket Under the P-Trap:** This will catch any remaining water in the pipes.
3. **Loosen the Slip Nuts:** Use an adjustable wrench to loosen the slip nuts that connect the P-trap to the drainpipe and the tailpiece.
4. **Remove the P-Trap:** Carefully remove the P-trap, being mindful of any water that spills out.
5. **Inspect the P-Trap:** Check for cracks, damage, or corrosion. If the P-trap is damaged, replace it with a new one.
6. **Clean the Threads:** Clean the threads on the drainpipe and tailpiece with a wire brush.
7. **Apply Plumber’s Tape:** Wrap plumber’s tape around the threads of the drainpipe and tailpiece.
8. **Reassemble the P-Trap:** Reconnect the P-trap to the drainpipe and the tailpiece, tightening the slip nuts securely.
9. **Turn on the Water Supply:** Slowly turn the shut-off valves counterclockwise to restore the water flow.
10. **Check for Leaks:** Carefully inspect the connections for any leaks. If you see a leak, tighten the slip nuts further.
Repairing a Leaky Drain Flange
1. **Turn Off the Water Supply:** Locate the shut-off valves under the sink and turn them clockwise to stop the water flow.
2. **Remove the Drain Basket:** Unscrew the nut holding the drain basket in place and remove the basket from the sink.
3. **Clean the Sink Opening:** Scrape away any old plumber’s putty from the sink opening.
4. **Apply New Plumber’s Putty:** Roll a rope of plumber’s putty and press it around the underside of the new drain flange.
5. **Insert the Drain Flange:** Insert the new drain flange into the sink opening.
6. **Reassemble the Drain Basket:** From underneath the sink, reattach the drain basket and tighten the nut securely.
7. **Remove Excess Putty:** Remove any excess plumber’s putty that squeezes out from under the flange.
8. **Turn on the Water Supply:** Slowly turn the shut-off valves counterclockwise to restore the water flow.
9. **Check for Leaks:** Carefully inspect the connection for any leaks. If you see a leak, tighten the nut further.
Repairing a Leaky Supply Line
1. **Turn Off the Water Supply:** Locate the shut-off valves under the sink and turn them clockwise to stop the water flow.
2. **Place a Bucket Under the Supply Line:** This will catch any remaining water in the line.
3. **Loosen the Connections:** Use an adjustable wrench to loosen the connections at both ends of the supply line.
4. **Remove the Supply Line:** Carefully remove the supply line.
5. **Inspect the Supply Line:** Check for cracks, damage, or corrosion. If the supply line is damaged, replace it with a new one.
6. **Apply Plumber’s Tape:** Wrap plumber’s tape around the threads of the faucet and shut-off valve connections.
7. **Reconnect the Supply Line:** Reconnect the supply line to the faucet and shut-off valve, tightening the connections securely.
8. **Turn on the Water Supply:** Slowly turn the shut-off valves counterclockwise to restore the water flow.
9. **Check for Leaks:** Carefully inspect the connections for any leaks. If you see a leak, tighten the connections further.
These are just a few of the most common *kitchen sink leaking underneath* repairs. If you’re not comfortable performing these repairs yourself, it’s best to call a qualified plumber. Many online resources also offer video tutorials that can be helpful.
Preventative Measures to Avoid Future Kitchen Sink Leaks
Prevention is always better than cure. Here are some preventative measures you can take to avoid future *kitchen sink leaking underneath*:
* **Regularly Inspect Your Plumbing:** Check under your sink regularly for any signs of leaks, corrosion, or damage.
* **Tighten Loose Connections:** Periodically tighten any loose connections on your pipes, faucets, and supply lines.
* **Replace Worn-Out Parts:** Replace any worn-out parts, such as O-rings, washers, and supply lines, before they fail.
* **Avoid Over-Tightening:** When tightening connections, avoid over-tightening, as this can damage the pipes and fittings.
* **Use a Drain Strainer:** Use a drain strainer to prevent food scraps and other debris from clogging your drainpipe.
* **Flush Your Drainpipe Regularly:** Flush your drainpipe with hot water and baking soda to prevent grease buildup.
* **Be Careful with Chemicals:** Avoid pouring harsh chemicals down your drain, as they can corrode your pipes.
By following these preventative measures, you can significantly reduce the risk of *kitchen sink leaking underneath* and keep your plumbing in good working order.
When to Call a Professional Plumber
While many *kitchen sink leaking underneath* can be repaired by homeowners, there are some situations where it’s best to call a professional plumber:
* **You Can’t Locate the Source of the Leak:** If you’ve tried the diagnostic steps above and you still can’t find the source of the leak, a plumber can use their expertise and specialized tools to locate it.
* **The Leak is Extensive:** If the leak is large or causing significant water damage, it’s best to call a plumber to prevent further damage.
* **You’re Not Comfortable Performing the Repair:** If you’re not comfortable working with plumbing or you’re unsure about any of the steps involved, it’s always best to err on the side of caution and call a plumber.
* **You Suspect a Major Plumbing Problem:** If you suspect that the leak is a symptom of a larger plumbing problem, such as a broken pipe or a sewer line issue, call a plumber immediately.
* **You’ve Tried to Repair the Leak and It’s Still Leaking:** If you’ve tried to repair the leak yourself and it’s still leaking, it’s likely that there’s a more complex issue that requires professional attention.
A qualified plumber can quickly and efficiently diagnose and repair any plumbing problem, ensuring that your home is protected from water damage. According to industry experts, attempting complex plumbing repairs without proper knowledge can often lead to more significant and costly problems.
Advanced Diagnostic Techniques for Persistent Leaks
Sometimes, a *kitchen sink leaking underneath* persists even after initial troubleshooting. Here are some advanced diagnostic techniques that plumbers often employ:
* **Pressure Testing:** This involves isolating sections of the plumbing system and applying pressure to check for leaks. It can help pinpoint hidden leaks within walls or under floors.
* **Smoke Testing:** This technique uses smoke to identify leaks in drainpipes. The smoke is forced into the drainpipe, and any leaks will be visible as smoke escaping from the pipe.
* **Camera Inspection:** A small camera is inserted into the drainpipe to visually inspect for cracks, blockages, or other problems. This is particularly useful for diagnosing leaks in hard-to-reach areas.
* **Moisture Meters:** These devices can detect moisture behind walls and under floors, helping to identify hidden leaks that may not be immediately visible.
These advanced techniques require specialized equipment and expertise, so they are typically performed by professional plumbers.
The Environmental Impact of Leaking Kitchen Sinks
A *kitchen sink leaking underneath* might seem like a minor inconvenience, but it can have a significant environmental impact. Even a small drip can waste gallons of water over time, contributing to water scarcity and increasing your water bill. Leaking water can also damage your home, leading to mold growth and structural problems. By promptly repairing leaks and taking preventative measures, you can help conserve water and protect the environment.
Consider the following statistics:
* A leaky faucet that drips once per second can waste over 3,000 gallons of water per year.
* Household leaks account for more than 1 trillion gallons of water wasted each year in the United States.
* Water damage from leaks can lead to costly repairs and increase the risk of mold growth.
By being proactive about leak detection and repair, you can make a positive impact on the environment and save money on your water bill.
## Q&A: Expert Answers to Your Kitchen Sink Leak Questions
Here are some frequently asked questions about *kitchen sink leaking underneath*, answered by our team of plumbing experts:
**Q1: My kitchen sink only leaks when I use the sprayer. What could be the problem?**
A1: This likely indicates a leak in the sprayer hose or the diverter valve within the faucet. Inspect the sprayer hose for cracks or loose connections. The diverter valve may need replacement.
**Q2: I have hard water. Does this increase my risk of kitchen sink leaks?**
A2: Yes, hard water can accelerate corrosion and mineral buildup within your pipes and fixtures, increasing the likelihood of leaks. Consider installing a water softener to mitigate this issue.
**Q3: I’m on a septic system. Can a kitchen sink leak affect my septic tank?**
A3: Yes, a continuous leak can overload your septic system, potentially leading to system failure. Prompt leak repair is crucial to protect your septic system.
**Q4: What’s the best type of plumber’s putty to use for sealing a drain flange?**
A4: A non-hardening plumber’s putty is generally recommended, as it remains pliable and allows for adjustments if needed. Ensure it’s compatible with the sink material.
**Q5: Is it safe to use chemical drain cleaners to unclog a slow-draining kitchen sink?**
A5: While they may seem convenient, chemical drain cleaners can corrode pipes and contribute to leaks. It’s best to use a drain snake or a natural alternative like baking soda and vinegar.
**Q6: How often should I inspect my kitchen sink plumbing for leaks?**
A6: A visual inspection every 3-6 months is recommended. Pay close attention to connections, pipes, and the area underneath the sink.
**Q7: What’s the average lifespan of a kitchen sink faucet?**
A7: A good quality faucet can last 10-15 years, but this depends on usage, water quality, and maintenance. Replacing a worn faucet can prevent future leaks.
**Q8: Can temperature changes affect my kitchen sink plumbing and cause leaks?**
A8: Yes, extreme temperature fluctuations can cause pipes to expand and contract, potentially loosening connections and leading to leaks. Insulating pipes can help mitigate this.
**Q9: I’m selling my house. Should I address a minor kitchen sink leak before listing it?**
A9: Absolutely. Even a minor leak can deter potential buyers and raise concerns about other hidden problems. Addressing it beforehand can increase your home’s value and appeal.
**Q10: What are the signs of a hidden kitchen sink leak that I might not see immediately?**
A10: Signs include musty odors, water stains on the ceiling below the sink, unexplained increases in your water bill, and dampness or mold growth in the cabinet under the sink.
Conclusion: Taking Control of Your Kitchen Sink Leak Situation
A *kitchen sink leaking underneath* is a common problem, but with the right knowledge and tools, you can often diagnose and repair it yourself. By understanding the anatomy of your sink plumbing, identifying the source of the leak, and following the step-by-step instructions in this guide, you can save time, money, and potential water damage. Remember to take preventative measures to avoid future leaks and to call a professional plumber when needed. We’ve shared insights from years of experience in plumbing repairs, and we hope this guide has empowered you to tackle this issue with confidence.
We encourage you to share your experiences with *kitchen sink leaking underneath* in the comments below. What challenges did you face, and what solutions did you find helpful? Your insights can help others who are struggling with this common plumbing problem. If you’re interested in learning more about plumbing repairs and maintenance, explore our advanced guide to home plumbing. If you have a particularly challenging situation, contact our experts for a consultation on *kitchen sink leaking underneath*. We’re here to help you keep your home dry and safe.
